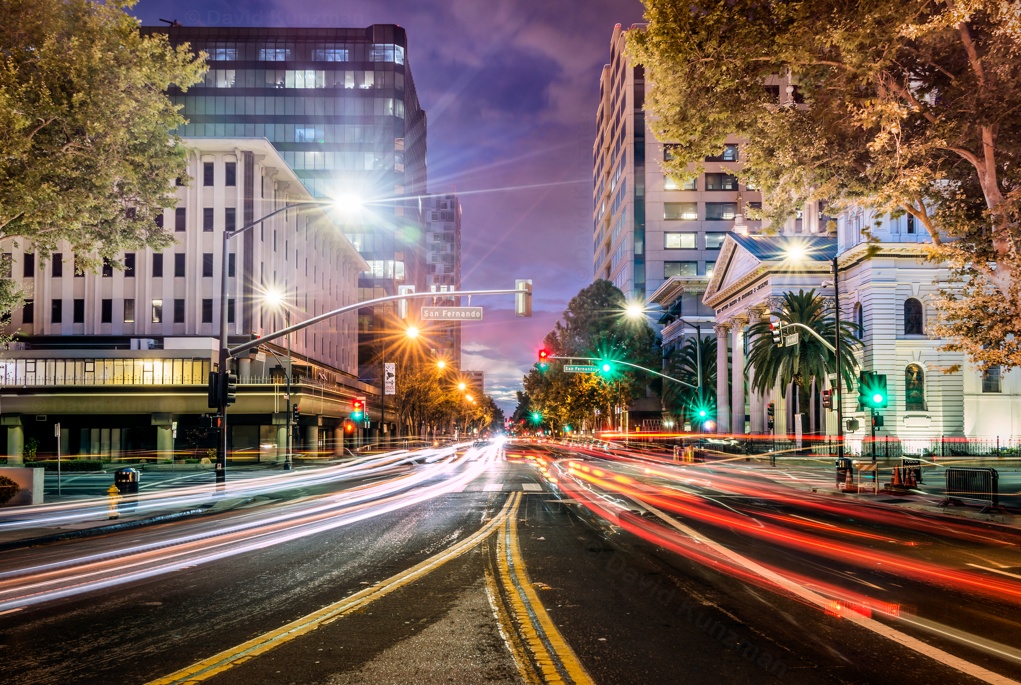
This is a long exposure photograph looking down Market Street in downtown San Jose. Because it is a long exposure, the headlights and taillights on the cars traced out paths of light as the cars drove through the camera's view. The photograph was taken near the corner of San Fernando Street and Market Street in San Jose, CA, with the camera facing northwest along Market Street. The sun had recent set below the horizon behind the buildings.
This is also a high dynamic range photograph, made up of three separate photographs each with a different exposure between 10 to 20 seconds long. Otherwise, the three photographs were the same. Because the sky, buildings, headlights, and taillights vary so much in terms of light, three exposures were required to capture the scene properly.
Similar to the Green Street photograph, this photograph was setup to make it look like the viewer (and thus the camera) is in the middle of the street as cars drive on either side. However, that is not actually the case. The camera and I were safe and sound, out of the road.
The full size photograph is just under 33 MP.
The area around the San Francisco Bay, is commonly referred to as the "San Francisco Bay Area," or just the "Bay Area" for short. This includes San Francisco, San Jose, Oakland, Silicon Valley, Mountain View, Berkeley, Napa, and many other notable locations. There really is no clear definition of the Bay Area, with different people defining different boundaries. I have heard a few different definitions myself while living here.
Long exposure photography, as the name implies, simply refers to photographs taken with relatively long exposure times. Typically, the photographer wishes to capture the movement of one or more elements within a scene over the course of the exposure. The resulting photograph then reflects this movement in some way. This technique can be used to create various effects, and thus is a useful technique for photographers to know.
Taking long exposure photographs can be a bit tricky. First and foremost, the photographer needs to imagine what is going to happen in the scene over time and how that will affect the final result. There are several technical aspects to take into account as well.
As with all forms of photography, managing the light in a photograph is important. Long exposure times can add yet another layer of complexity to lighting. Not only does the light build up over a longer period of time, but it may also move around and/or change in intensity. The exposure settings on the camera also govern how the movement will be captured, including how much overall movement is captured and how much each element of the scene contributes to the final image. Many factors, such as how bright an object is, how reflective it is (e.g. glossy vs matte), how fast it is moving, the use of flashes, and so on, all play a role in how an object will show up in a long exposure photograph.
Secondary effects, such as camera shake and sensor noise, have a higher chance of affecting long exposure photographs as well. Digital camera sensors tend to generate more noise when they are exposed for longer periods of time. Camera shake can become a factor as well. Even small, subtle movements can affect the sharpness of the image. For example, cameras are commonly placed near roadways when photographing the light trails created by cars driving at night. Vibrations caused by those cars can subtly and constantly shake the camera, introducing a slight blur in the final photograph.
More examples of long exposure photographs that I have taken can be found here.
In high dynamic range photography, the scene being photographed is captured at multiple levels of light (exposures). This allows all portions of the scene, whether they are bright or dark, to be captured with sufficient detail in at least one of the different exposures. The brightest exposures provide detail in the darker areas of the scene, but wash out the brighter areas. Meanwhile, the darkest exposures provide detail in the brightest areas of the scene, but the darker areas are quite dim and hard to see.
Later during post-processing, the different exposures are combined using software to create a single high dynamic range image. The resulting HDR image includes all the details from across the scene, regardless of bright or dark areas particular portions of the scene were.
It is also common to remap the HDR image back into a standard dynamic range (SDR) image using a method known as tone mapping. Depending on the tone mapping method used, the resulting SDR image may look either realistic or unrealistic. Tone mapping is often necessary to share photos taken using HDR techniques since many of the most common image formats only support SDR.
More high dynamic range photographs I have taken can be found here.
Any comments or suggestions should be sent to [ comments at davidkunzman.net ]. Unless noted
otherwise, the artwork, photographs, articles, and blog posts presented on this website, along
with the general website design are copyrighted by David Kunzman. ©2010-2026 David Kunzman. All rights reserved. Facebook, Twitter, and other logos (and
icons, buttons, etc.) are trademarked and/or copyrighted by their respective owners. Social
media icons are copyrighted by and were downloaded from IconShock.com ![]() . RSS feed
icons are copyrighted by and were downloaded from Feed Icon Guidelines
. RSS feed
icons are copyrighted by and were downloaded from Feed Icon Guidelines ![]() .
.
Page generated Saturday, July 11th, 2026 at 5:19 -0700 GMT