Let's say you want to take an high dynamic range (HDR) photograph and 6 different exposures (each 1 EV apart) will cover the range of lighting in the scene you are photographing. Sure, you could take each exposure one-by-one by simply pressing the shutter-release, adjusting the exposure, pressing the shutter-release, adjusting the exposure, pressing the shutter-release, and so on until all 6 shots have been taken.
... OR ...
You could do it really quickly by using bracking and taking the exposures out of order. Instead, set your camera to do 3-shot bracketing with a 2 EV difference between exposures. Now, to take the 6 different exposures that are 1 EV apart from each other, simply do the following... press and hold the shutter-release until the first set of 3 exposures are finished (X EV, X-2 EV, and X+2 EV where X is the exposure you have set your camera to), adjust the exposure by 1 EV, and finally press and hold the shutter-release until the last set of 3 exposures are finished (adjusting up gives you X+1 EV, X-1 EV, and X+3 EV; adjusting down gives you X-1 EV, X-3 EV, X+1 EV). In the end, you get 6 shots that are all 1 EV apart in terms of exposure while only having to press the shutter-release twice and adjusting your exposure settings once and only by 1 EV!
In situations where time is of the essence, this technique will allow you to take the shots in just a few seconds. But like everything else, this technique comes at a cost. The exposures will be out-of-order on your memory card. For example, if you adjust up the final order of the exposures will be X EV, X-2 EV, X+2 EV, X+1 EV, X-1 EV, and X+3 EV. Compare that to the case where you take them one-by-one in order (X-2 EV, X-1 EV, X EV, X+1 EV, X+2 EV, X+3 EV). In my mind, the ordering difference is a small price to pay for the speed... but maybe that's just me.
There are a lot of articles floating around the internet that talk about using bracketing. In particular, they usually cover using bracketing when trying to take multiple exposures with the intent of combining them into a single high dynamic range (HDR) photograph. However, I typically do not see these articles exploring the different ways in which you can use bracketing to take as many photographs as possible while also minimizing the number of adjustments that you need to make on your camera between shots. Why might you care about making the fewest adjustments as possible? Well, if you are using a tripod and time isn't an issue, then honestly, you probably won't care all that much. However, if you aren't using a tripod and you want to minimize camera movement or if time is an issue, then more adjustments mean more camera shake and more time between shots.
If you are already familiar with bracketing, skip the next section and move directly on to the section on Considering Different Shot Orders. If not, the next section will give you a quick overview of the ideas surrounding bracketing.
The idea behind bracketing is fairly simple. The idea is to take multiple photographs of the same subject, but with different exposures. Figure 1 illustrates what three different photographs taken at three different exposures looks like. Of course, you could take the same three photographs by hand by simply taking each one individually and just adjusting the exposure between each shot. However, you don't have to. In fact, there are cases where it is beneficial not to do it by hand.
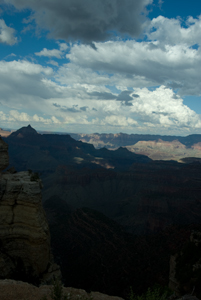
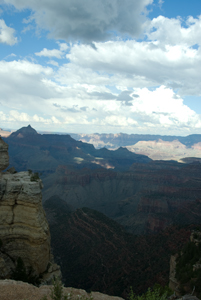
| (A) Exposure: −1 1/3 EV | (B) Exposure: ±0 EV | (C) Exposure: +1 1/3 EV |
 |
 |
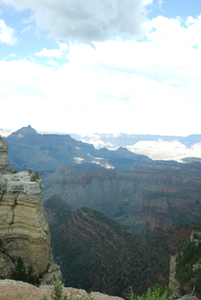 |
Figure 1: A sequence of three photographs taken using bracketing (±1 1/3 EV steps).
First, let's take a look at the photographs in figure 1 to understand why we want to take multiple exposures. In this case, these are three photographs taken 1 1/3 EV steps apart from one another. Notice that the sky in the first exposure (A) has a lot of detail, but the ground in the canyon is dark and under exposed. Compare this to the exposure in (C), where detail can be seen in the ground, but now the sky is over exposed. The exposure in the middle (B) tries to find a middle ground, but still has some areas in the sky that are too bright and some areas in the canyon that are too dark. Because no one photograph captures all of the detail in the scene that we want with at least a decent amount of exposure, we want to take multiple photographs with the intent of combining them later. For example, using Adobe Photoshop, we could combine the sky in exposure A with the canyon in exposure C to create a single photograph where both the sky and the canyon are clearly visible (i.e. neither are over or under exposed).
When using bracketing, there are two settings to think about. The first is the number of exposures that you want the camera to take. Most cameras can be set to take either 2 or three shots at a time (i.e. with a single press of the button, but remember to hold it down until they all finish). In the case of 2 exposures, the camera can either be set to take the current exposure and a darker exposure or the current exposure and a lighter exposure. In the case of 3 exposures, the camera will take the current exposure, a lighter exposure, and a darker exposure. The second second setting is how "far apart" the individual photographs should be in terms of exposure. Usually cameras support up to a difference of 2 EV steps between the individual photographs, adjusted at 1/2 EV or 1/3 EV increments (i.e. can be a difference of 1/3 or 2/3, but not 1/5 or 3/7). Of course, if you want to know what your particular camera can support, refer to your camera's user manual.
First, I'm going to use the term "button interactions" as generic term for any button press or dial turn that you make on your camera during or between individual photographs. Examples of button interactions include pressing the shutter-release button, adjusting the shutter speed by a 1/3 step (or 1/2 step, depending on your camera and settings), or any other adjustment you might make between shots.
Figure 2 illustrates five different ways of taking six different exposures, each being separated by 1 EV to create a range of exposures from X-3 EV to X+2 EV. Of course, the actual value of X will depend on the lighting of the actual scene that you are photographing.
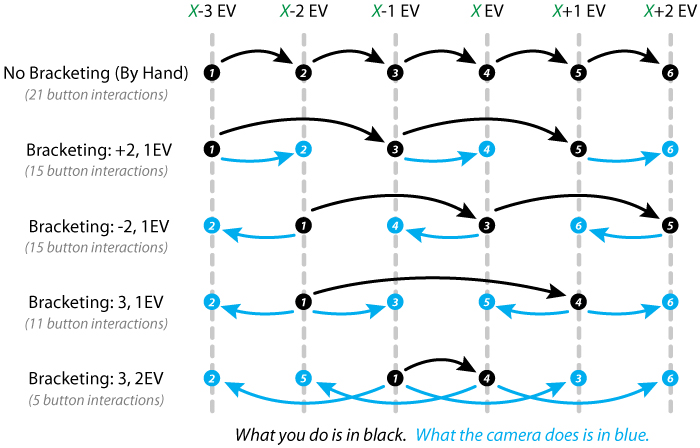
The most straight forward way of getting all six exposures is to just take the six photographs by hand, adjusting the exposure by 1 EV between each shot. The first row in figure 2 illustrates all the "actions" that need to be taken by a photographer using this method. Each circle represents a press of the shutter-release button. Each arrow represents an adjustment to the shutter speed to change the exposure. On my Nikon DSLR camera, a dial is used to adjust the shutter speed, and the camera is set to adjust the exposure by 1/3 EV each time the dial is rotated by one position. If we count rotating the dial by one position as one button interaction and each press of the shutter-release button as one button interaction, then this method will require a total of 21 button interactions (6 shutter-releases, and rotating the dial 3 positions between each exposure, for a total of 15 dial position adjustments). Too much! We can do better by using bracketing.
Skipping ahead to the fourth row in figure 2, this row represents what the photographer would have to do if they used 3-way bracketing in a straight forward way. The obvious way to use bracketing on your camera to reduce the number of button interactions is to set the bracketing function on your camera to take three exposures, each separated by 1 EV. Since the camera is doing more work for you (the stuff in blue), the photographer has to interact with the camera less (i.e. less camera shake and less time to take the shots). Using this method, the photographer only needs to press (and hold) the shutter-release button twice. However, they also need to rotate the shutter speed dial by 9 positions between each set of exposures, for a total of 11 button interactions. That is about half the number of interactions required if the photographer did everything manually, as was the case in the first row of figure 2. However, we can still do better.
The second and third rows of figure 2 are included for completeness. They represent the actions that the photographer would need to perform if 2-way bracketing were used, instead of 3-way bracketing. In both cases, more button interactions are required of the photograph to take the same 6 exposures.
The fifth and final row in figure 2 represents a method that reduces the number of button interactions even more by using 3-way bracketing in a manner that is not quite as straight forward as the previous method. In this case, we also use 3-way bracketing, but interleave the shots by setting the exposure difference between the bracketed shots to 2 EV. In this case, we still only need to press (and hold) the shutter-release button twice. However, we only need to rotate the shutter speed dial by 3 positions (instead of 9), reducing the total number of button interactions to 5. That's 6 exposures with just 5 button interactions (2 shutter-releases and rotating 3 positions on the shutter speed dial). If your goal is to reduce the time it takes to take the shots with as little hand movement as possible between the shots, in my opinion, this is the way to go.
To understand what is happening, the each of the circles is numbered, indicating the order in which the exposures are taken. The first bracket set is centered on X-1 with a separation of 2 EV (see circles 1, 2, and 3). Once that bracket set is finished, simply move the shutter speed dial by three positions (1/3 an EV each) to center the second set of bracketed shots around X (see circles 4, 5, and 6).
We can also take a larger range of exposures using this method, but it has to be done in sets of 6. For example, if we wanted to take 12 exposures each separated by 1 EV using the method in row 5, we could set the bracketing to 3, 2 EV and then perform the following sequence... press (and hold) the shutter-release, rotate the shutter speed dial 3 positions (1 EV), press the shutter-release, rotate the dial by 15 positions (5 EV), press the shutter-release, rotate the dial 3 positions (1 EV), and finally press the shutter-release button one last time. That is a total of 25 button interactions. Compare that with bracketing set to 3, 1 EV, in which the sequence would be... press the shutter-release, rotate dial 9 positions, press the shutter-release, rotate dial 9 positions, press the shutter-release, rotate dial 9 positions, and press the shutter-release... for a total of 31 button interactions. In the case of 12 exposures, the difference between the two methods is not quite as striking, but the 3, 2 EV bracketing method still requires fewer button interactions. Both of these methods are better than the no bracketing method used in row 1, which would require a total of 45 button impressions.
I'll leave it to the reader to figure out how to do a sequence of 18 exposures (and to figure out why you would want so many exposures).
Any comments or suggestions should be sent to [ comments at davidkunzman.net ]. Unless noted
otherwise, the artwork, photographs, articles, and blog posts presented on this website, along
with the general website design are copyrighted by David Kunzman. ©2010-2026 David Kunzman. All rights reserved. Facebook, Twitter, and other logos (and
icons, buttons, etc.) are trademarked and/or copyrighted by their respective owners. Social
media icons are copyrighted by and were downloaded from IconShock.com ![]() . RSS feed
icons are copyrighted by and were downloaded from Feed Icon Guidelines
. RSS feed
icons are copyrighted by and were downloaded from Feed Icon Guidelines ![]() .
.
Page generated Thursday, July 30th, 2026 at 2:03 -0700 GMT